Monday 16 December 2013

Just not purple

I can't believe we are already in the Christmas holidays.  We have been home now for 3 weeks and I am only just now getting back up to date.  Getting used to the weather here has been a joke, we were having temperatures of 30C and upwards and it was only 2C when we arrived home.  Now though, the weather is just doing nothing.  Nothing, because it is not really cold but also not really warm, very little sunshine and not much else, just DULL dark overcast gloomy days.  Still, we have seriously cold weather in Canada to look forward to and I expect I will be glad of the English weather when we get back (LOL)

Just not purple


I have been collecting fat quarters in black with cream, silver, grey and tan prints for the last year and decided to make a quilt from the book "Spotlight on Neutrals" by Pat Wys for a friend who loves purple, but when I asked her which shade of purple was her favourite, she replied "Love purple, all shades of it, but everyone is buying me everything in purple and I'm  starting to feel a bit purpled out".
I thought the colours would fit in, being quite neutral, with all her other purple furnishings.  I only had 2 weeks to finish the quilt as I wanted to give it to her for Christmas so all other projects were put on hold whilst I cut out and pieced together the quilt top.


 I wasn't too sure which colour thread to use, there are 3 distinct blocks in the quilt, some very dark squares (mainly black), the mainly light stars and the smaller chequerboard block with equal amounts of light and black.  The back of the quilt is tan and after trying silver, grey, black, cream and tan threads on small areas (which I then had to unpick) I decided to do all the quilting in tan.  My top thread is Glide Mocha and I used Cream Magnaglide in the bobbin with a size 14 needle.

I have just worked through Jamie Wallen's "Mystical Grids" tutorial so decided to use one of his designs for inspiration to quilt the larger dark squares, it was then easy to decide how to quilt the smaller chequerboard blocks.

Large on point nine patch blocks

Small chequerboard squares

The challenge was the cream star blocks.  I wanted feathers but did not want too romantic or too formal looking feathers, so feather fronds were chosen with a little swirly curl at the top end.  I didn't want all those feathers to join together in the centre of the star though (too dense quilting) so I quilted a square in the centre of each star with the same design as in the large dark square blocks.


Light coloured star blocks design

Only the outline edge of all the blocks were quilted with SID (stitch in the ditch).  The outline of the little squares in the centre of the stars and the SID were done using rulers, everything else was quilted free motion, which is my favourite quilting style.


Back of quilt before binding stitched on

Quilting completed, just binding to stitch in place

Detail of quilting on the back

Quilting detail on back - not true colour, but adjusted to show up quilting


I loved quilting this quilt, it was very hard to give this quilt away but then, if we don't love the presents we give, are they worth giving?


Dutch treat update
I did not manage a great deal of sewing when in Indonesia so it is just as well that I was so ahead of myself in October.  I will cheat and add the ones I did in November to the ones in December  and pretend that it was all one month. Not that I am kidding anyone ...


Saturday 26 October 2013

Quilt tops ….before trip to Indonesia

Quilt tops ….

Why the heading "Quilt tops"? Well, before I got my HQ, I had a pile of quilt tops, always delaying the quilting while I stitched and pieced the next quilt.  Now I seem to never have enough tops to quilt!  When I have finished one quilt, I can't wait to get the next one loaded onto the HQ and have even resorted to just loading a plain piece of fabric on the HQ just so that I can do some quilting when I didn't have a quilt top ready. Is that possible?  Well yes, and I decided to do something about it.  So this month, while my HQ was in sick bay for 2 weeks (timing issues, which are now thankfully sorted out) I started cutting out my next 4 quilt tops (4 because my Husky was having a service at the same time -and no, I did not plan it this way!)
I did make up for not being able to sew for 2 weeks though and stitched two more quilt tops and these are now waiting for quilt design inspiration:

These are the blocks from the first quilt:


Most of the fabrics are from the Stonehenge range by Northcott.  I used a solid black for the triangles around the centres and the centre blocks of both block designs are in a mottled autumn brown. The pattern is called "Texas Star" and is by "Whirligig designs".  I am still waiting for inspiration on how to quilt this top, but love that there are large open spaces for quilting, not so sure about the blocks...    

Now how to quilt it?


The second quilt is called "Kleintyd by Ouma", which translated means "Childhood with grandma".
I have called it this as my earliest memories were of staying over at my grandma's house where the curtains in her lounge were in a rich red floral print chintz.  There was a rose hedge all around the front garden and Ouma's favourite colour was red. I was given the most lovely soft red brushed cotton  pyjamas with little rosebuds embroidered all around the yoke when I stayed here and Oupa gave me my breakfast every morning which was homemade rusks dipped in steamy hot coffee made with condensed milk. Ouma sadly is no more, but she has played a huge role in my life and I dedicate this quilt to Ouma.
The piecing is an uncomplicated design, but I plan to make it very special with the quilting design.

Kleintyd by Ouma


Trip to Indonesia

During November, I will be away for 3 weeks as my lovely hubby and I celebrate our 25th wedding anniversary on 29th October.  We will be doing an expedition cruise starting in Singapore and stopping along the way at several islands in Indonesia before flying home from Cairns in Australia.  I am not sure how much sewing I will get done during the trip, but I am planning on taking my Dutch Treat project with me.  At least it will keep me busy during the long flights!  I  managed to stitch 26 blocks during October, so I am way ahead of my target now.  These are all the blocks I have done so far, the pile is nicely growing (grin):

Only 123 to go


I have however just realised that the piece of fabric I had set aside for the border, is no longer, as I have used it for a background piece on my hexagon quilt, forgetting that I have not yet cut out the pieces for the border, so in next week I will go back to the shop where I bought it from and hopefully they will still have some, otherwise I will need to rethink my border.  Does anyone make notes of where they bought each piece of fabric? And will it be any use, as undoubtedly, should you run short,  by the time you have discovered this, the line will be sold out and discontinued?  Note to self…cut all the pieces out at the start of the project so you can get the shortfall while it is still available. Unless of course you are just buying a piece because it will become a piece of fabric to be stored with other stash and to be looked at occasionally.
On this note, I bought some lovely fabric in Borneo on our trip there at Easter, not for stash!!!  I have still not used it, but I have plans for it.  Watch this space ….


Fabric sold  with a second smaller piece,  meant for a sarong and a scarf 

These are sold as fabric panels for making sarongs, but I have other plans for them

One of the expedition guest lecturers  on our cruise is Kim Jane Saunders, author of "Contemporary Tie and Dye Textiles in Indonesia", sounds like a kindred spirit to me.   I am hoping we will be visiting some fabric shops so that I can support the local economy  and come and advertise on their behalf. (LOL)


Happy Halloween everyone


Saturday 5 October 2013

Hearts desire

 Great news
I took my quilt "Sea Urchins" in to my local quilt shop this week as it will be on display in the shop during the Contemporary textiles exhibition from 14th to 19th November and a photo was taken of the quilt and then tweeted by the shop.  Not long after, I am told that the editor of a British patchwork magazine has phoned up and enquired whether I would be willing to do a feature in the magazine. I have no idea how this is done, but will no doubt find out, this is so exciting!

Hearts Desire

I have been making a quilt for a baby girl, she is due in December and mum wanted a wholecloth quilt in pure white, with the stitching done in maybe white or pink.  Mum liked a design with a heart, but also liked the idea of having the baby's name quilted onto the quilt, so I adapted the pattern to fit the size of cotbed and added an extra design in near the bottom so that the baby's name can be quilted and framed by feathers and flowers.

Design all marked out


Stitching main design

Starting with backgound fill


Having done a few small practise pieces, I decided to do the quilting in white Gliss thread with Pink Gliss outlining the flowers and feathers.  The background quilting is done with Superior Kimono Silk thread in Rice White which looks really nice on the Kona Solid white cotton fabric.  I used a size 14 needle for the Gliss threads and a size 12 needle with the Kimono silk threads.
Having tried a few types of wadding, I decided on Quilters Dream Puff, as it gave the most "puff" in the feathers and flowers and is lovely and soft apart from in the most densely quilted areas.  It also is pure white, so the quilt will remain pure white, rather than look "antique" white.


Detail of border 


Detail of heart


Space for baby's name


For now I have left the baby's name blank, Mum is happy to tell me what it is going to be, if I promise not to tell anyone else, but I would rather add it later.  Perhaps it might be better to put just the initials in rather than the full name?
All that is left to finish the quilt  is the binding and then quilt in the baby's name and fill in around the name.  I will post a picture of the whole quilt once it is all finished.  Because this baby is a long awaited for baby, I have called the quilt "Hearts desire"
I just love how this has turned out.

Update on Dutch treat
Hooray, I have done 15 blocks in September, here they are:

September blocks - now only 149  to go


 and I also made this gorgeous fluffy Smiley cushion cover for the youngest daughter, or rather I just finished it off for her.  She has done the smiley face a while ago and didn't know what to do with it, so we talked through the options and she decided that she would like it on a cushion.  I think it has turned out rather fun and cheerful.


Remember to post a comment if you would like to win a quilt from me :-)

Wednesday 2 October 2013

Want to win a quilt?

When I had just started this blog, it was to really start to record what I am doing and build up a timeline.   I thought I might get the odd interest and maybe all the rellies will be looking at it. After the first month, I had just under 300 views and I was so excited.  I thought I would have a huge  celebration when I have reached 1000 views, but then I missed it and did not pay too much attention to how many viewers I had as I was struggling to organise my time efficiently between spending time with family, going on holidays and trips, still keeping up the stitching and doing lots of courses.  (I have discovered the joy of tutorials on Craftsy and so many many more on You Tube and can safely say I have become a bit of a tutorial junkie).
Then when I updated my last blog, I had a look at all my settings as I am thinking of  updating my profile and to my surprise there were 4,996 views (my own excluded).  I could hardly believe it, but kept my fingers crossed and wondered if it would reach 5,000 without another update. It did and now I am celebrating!

ANOUNCEMENT

Everybody who leaves a comment from now on, on my blog, until I have reached 10,000 views, will be entered into a draw to win a quilt.  The quilt will be made by me and quilted by me, it will be a double size quilt  and I will post updates on the blog with photos of the progress of the quilt.  The quilt will  be delivered by myself,  if this is possible, or posted out by secure post.  Should the quilt incur import taxes, I will however not be responsible for that. I will announce the winner of the quilt on this blog within a month of reaching 10,000 views.
Thank you to everyone who has so far showed an interest in the blog, I do hope you will come back to see what other projects I am working on.


Monday 23 September 2013

"Lovesong" and "Stars"

Stars
"Stars" for my husband completed

I started "Stars" for my husband (yip, this is the first quilt I have ever done for him) in 2009 and finished the piecing later that same year.  At the time I thought I would quilt it by hand as it was simply too large for someone as inexperienced as me,  to quilt it by machine.  For the time being, it was put in a pile with other WIPs and I more or less "forgot' about it as so many other projects kept cropping up.  Once I had my Handiquilter  though, I had no more excuses, so after  working my way slowly through the pile of other WIP (in strict order that they were pieced) I finally got down to this one.
I had the brilliant idea of suggesting to hubby that he comes with me to our local quilt shop to choose the backing fabric and he was rather keen.  I was rather hoping for a dark purple kind of extra wide batik, but this was not to be ... hubby had spotted a batik that looked a bit like snakeskin and he knew straight away this was what he wanted.  I was not so sure, it didn't come in extra wide so I would need to piece it and the colour was rather busy for my liking, especially as the front of the quilt has so many colours in, but I offered and I had to then stick by my offer.


Backing fabric chosen by hubby

The stars are all quilted with the same block design with a variation of that for the setting in triangles.  I used  Madeira Polyneon 1609 with Superior Thread's Bottom Line in Taupe which blended brilliantly with the backing fabric (I find that this colour blends with most of the backing fabrics that I use, it is the one colour I would not like to run out of) and a size 14 needle, which seems to work for me with most threads.  The Madeira thread is variegated and matched all the coloured stars beautifully.


At 98 x 84" this is the largest quilt that I have done so far and it fits perfectly on our bed.  Most importantly though.....hubby loves it. :-)


Lovesong

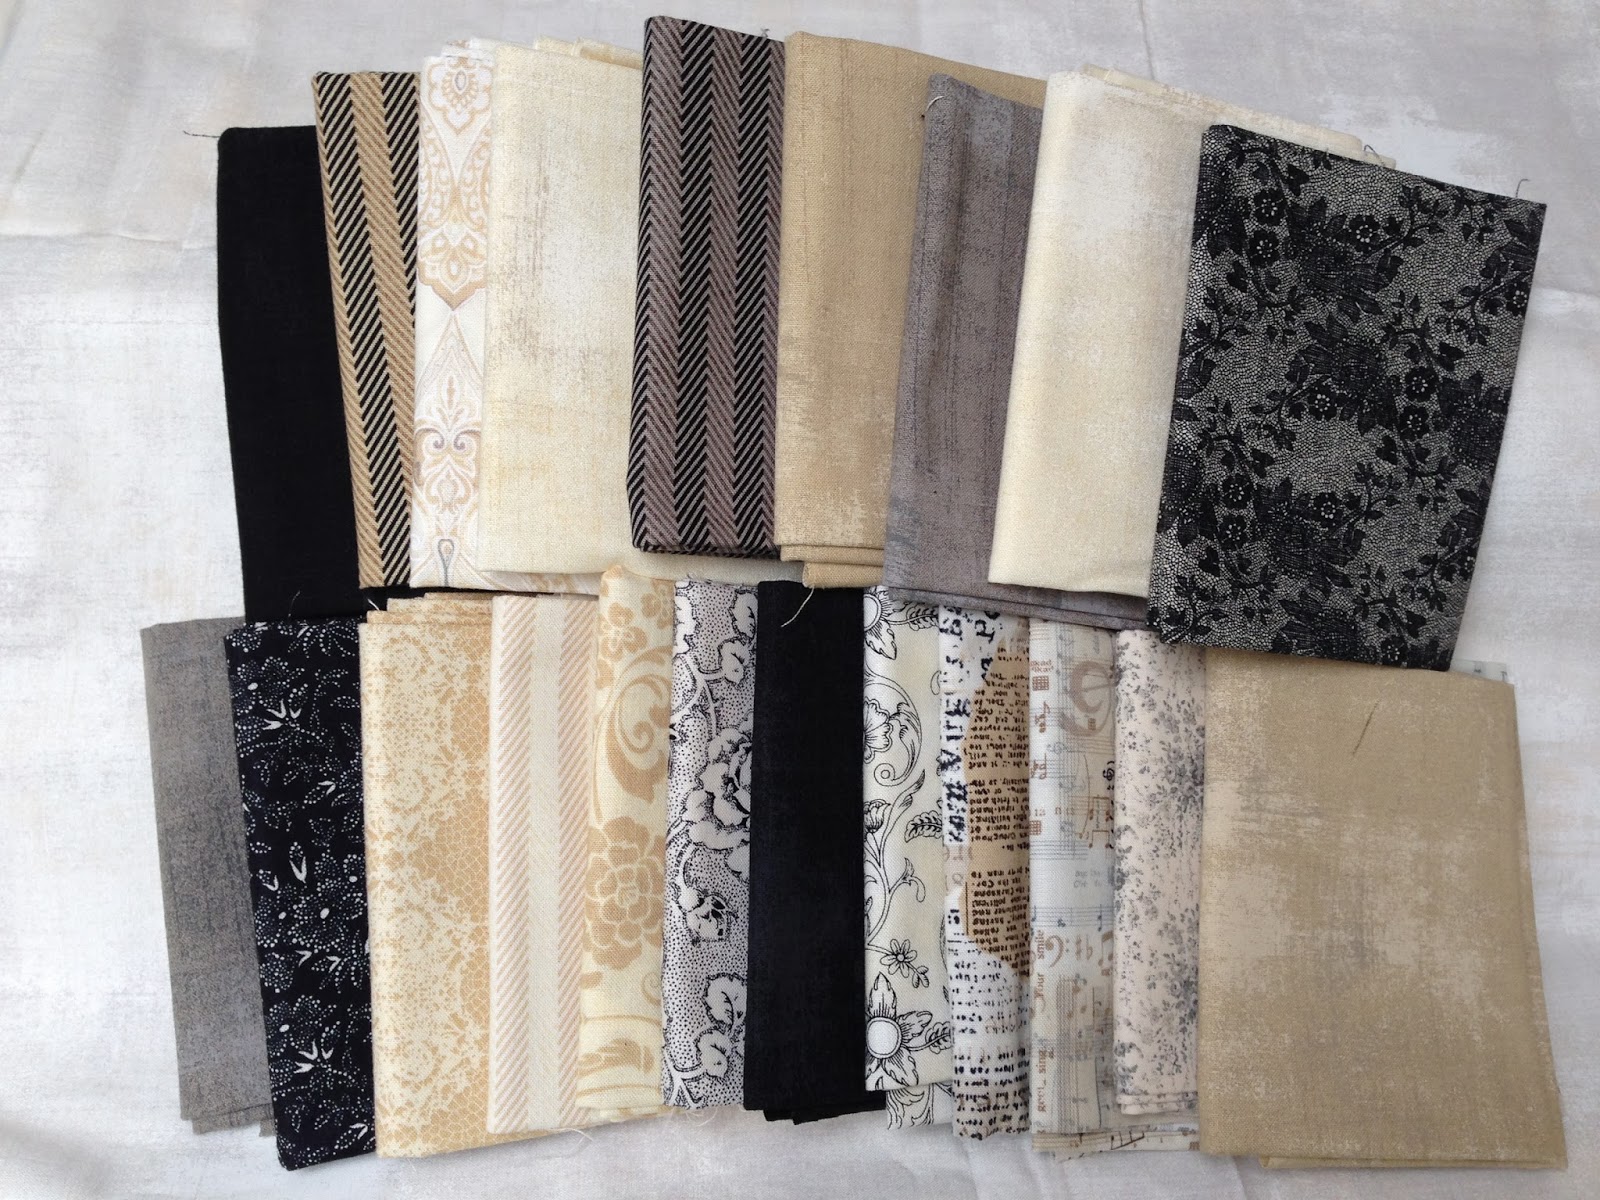
I bought the pattern for Lovesong after it has run it's course as a BOM, the pattern is called "Vintage Valentine" and is by Verna Mosquera. There was no more fabric from the original BOM available, but that was fine by me, I do like to do my own thing anyway and set about collecting fabrics that I could use.  I wanted to maintain the "romantic vintage" style so stuck with  faded and muted colours.  Although this was not my first applique project, it was certainly the biggest one I had done to date and I have certainly learned a lot in the process.  I can't wait to start my next applique project, but for now I am wading through all my WIPs trying to finish them all before I start any new projects, although I do have a commission for a wholecloth quilt for a baby that I need to have finished before December, so that will be my one "new" project and will be my next post.


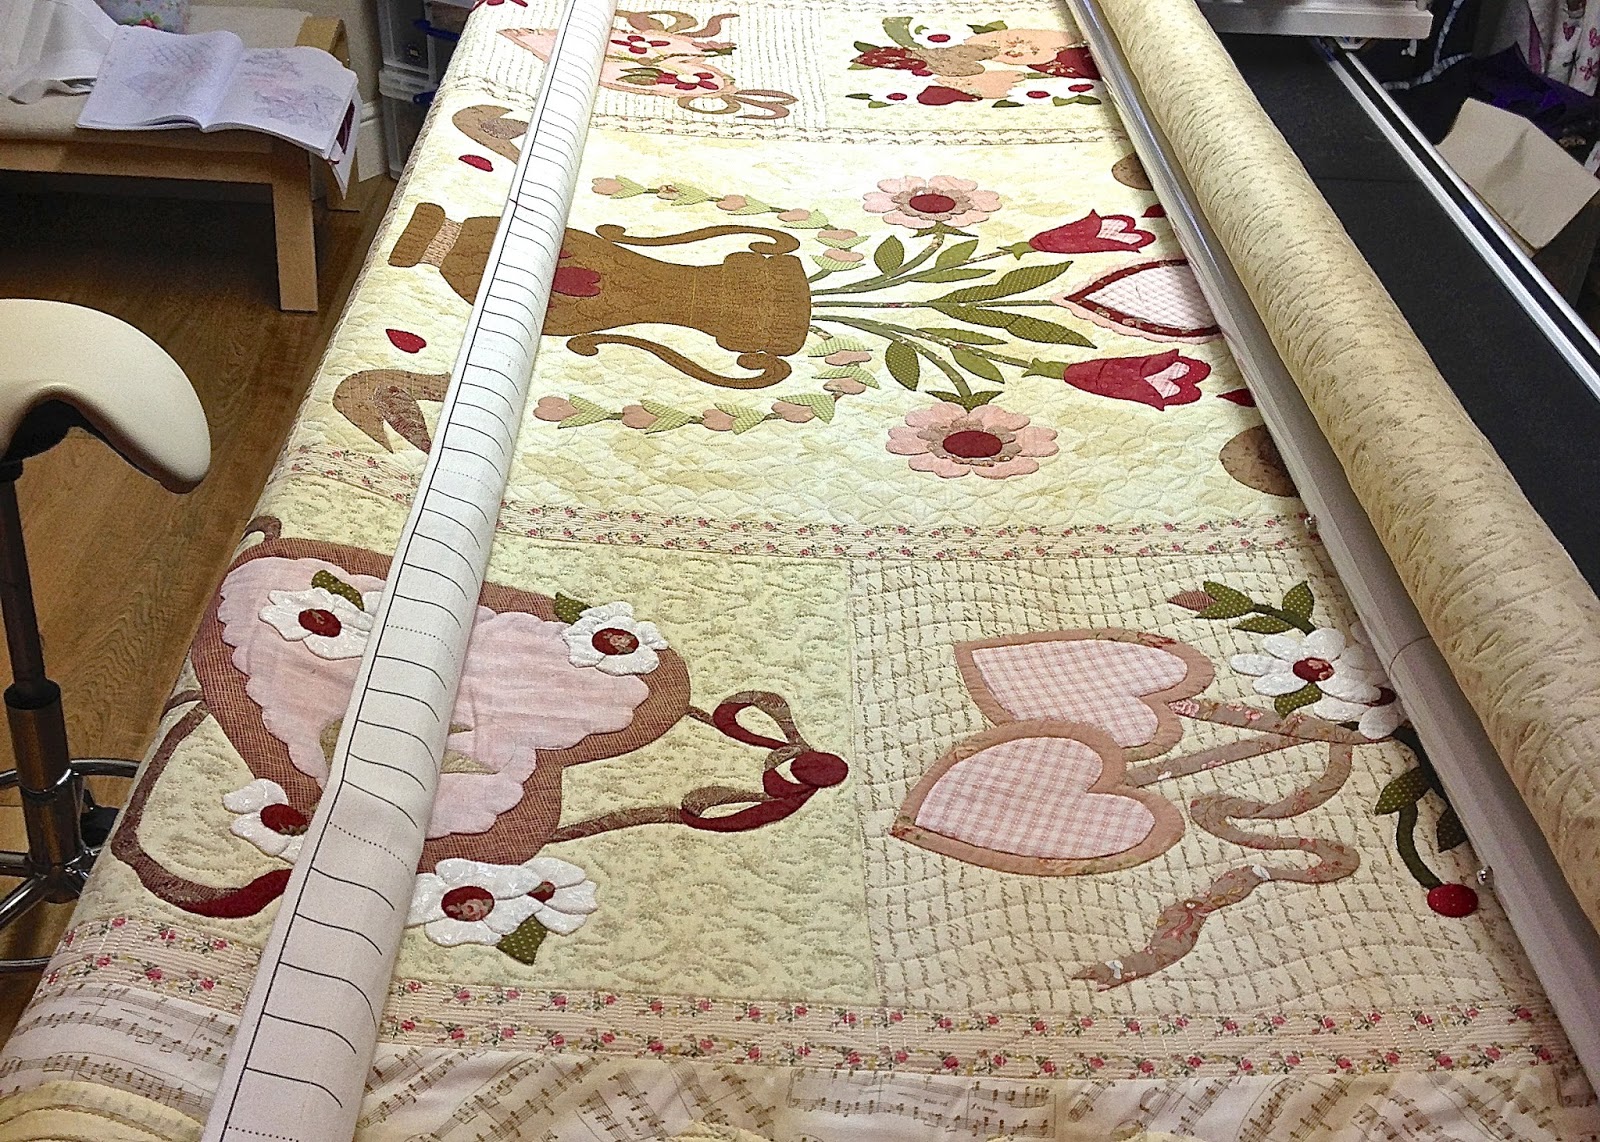
Quilt ready for outline quilting


I started with outline quilting all the appliques in Wonder Invisible thread in Clear with Cream Bottom Line in the bobbin.  I used a number 14 needle and after a few tries got the tension just right.  I did the outline quilting by eye and went slightly over the applique pieces in a few places, but I decided to just unpick this at the end.  I have since seen Jamie Wallen (from Quiltersapothecary) use a special ruler called a Mystical Mini, to guide you around the appliques, that I might want to try out. The next step was to outline the blocks and do all the background infill and the two narrow  borders.  All this was done with Glide thread in Cream, still with Cream Bottom Line.


Background quilting done


Next came some experimenting with Golden Threads Quilting paper (GT paper) I have decided on a rope and feather border for the outside border going outwards from the corners and wanted to design a pattern with ribbon and flowers to tie in with the design in the rest of the quilt in the centre point of each border, so I traced my rope and feathers onto the GT paper and then did the same with my centre design.

 I then took 3 more pieces of GT paper and clipped them together and started stitching through the designs on my sewing machine, with a thick needle and no thread.  This took absolutely ages but I was determined to stick to the lines and get it as perfect as I could.  This was then going to be used to pounce through onto the border fabric so that I could see where to stitch.  To my absolute horror, when I pounced through the holes, the powder did not show up at all.  I only had white powder (note to self to buy some blue powder) so the alternative was to stitch through the paper stencils but it was impossible to see where the holes were as the background fabric is so busy and similar in colour to the GT paper.  I now had 2 options:
a. Use my stencil as a pantograph or b. draw over the holes on all the stencils and stitch through the GT paper over lines that I can see.  I decided on the latter and started drawing next to all my carefully stitched holes (the pencil did NOT like going over the holes), then used 505 to position it onto the border.


See why I could not see punched holes on this background?


Stitching the design took no time at all, but then came removing  the GT paper.  This is a bit like being told it is really easy and the paper will just tear away (sounds a bit like foundation paper piecing paper, doesn't it, only having done that I know better) and it probably would if there are no tight areas of stitching and if I hadn't gone a bit overboard with how much 505 I sprayed to secure my stencils.  Unfortunately only one way to find out.  I had to take the quilt of the HQ and unpick all the paper and then tease the remaining stuck bits out from underneath the quilting stitches with a tweezer.  I am not joking when I say that this took an entire afternoon, but finally this was done and I could load the quilt back onto the HQ for the final bit of quilting.
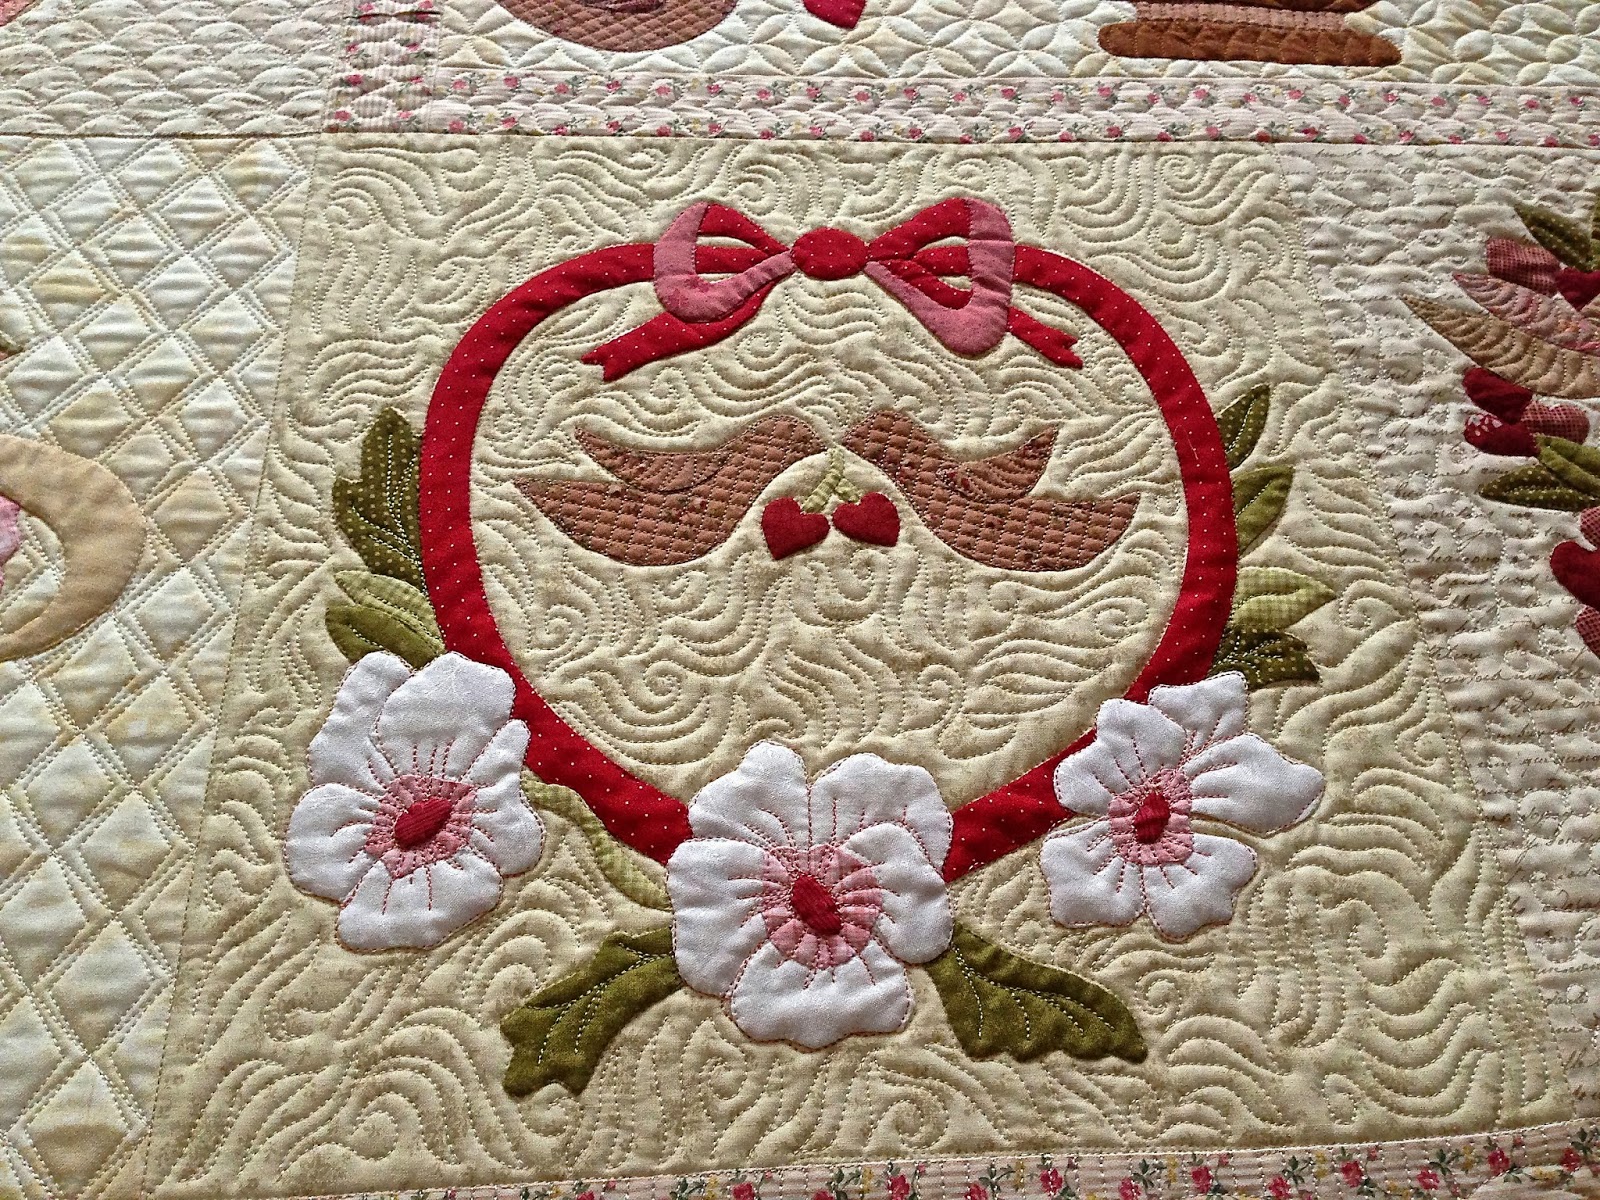
This was when the fun began!  I now played with some embroidery threads to fill in the applique shapes, first the flowers and leaves and birds and finally the heart shapes.  As the embroidery threads are darker in colour, I changed my bobin thread to Taupe Bottom Line so that if the bottom thread pulls through, it would not be too visible on the front.  This gave rather a nice but still subtle effect on the back.


Block 1

Block 2

Block 3

Block 4

Block 5

Block 6

Block 7

Block 8

Block 9


Block 10


Block 11
Block 12


Centre Panel


The final stage was to do the background fill in the outside border, which I did with the Cream Glide thread and Cream Bottom Line.  Almost as soon as I started on this, I realised that my quilt design is totally lost in the busy fabric.  Do I redo the outline in a darker or contrast thread or do I stick with the original plan.  I decided to stick with the original plan.  Besides subtle can be good, the quilting does not have to be the first thing you notice in the border and that makes it such a surprise when you turn the quilt over and see the quilting on the back.  In fact, my family thinks the back of this quilt looks better than the front!

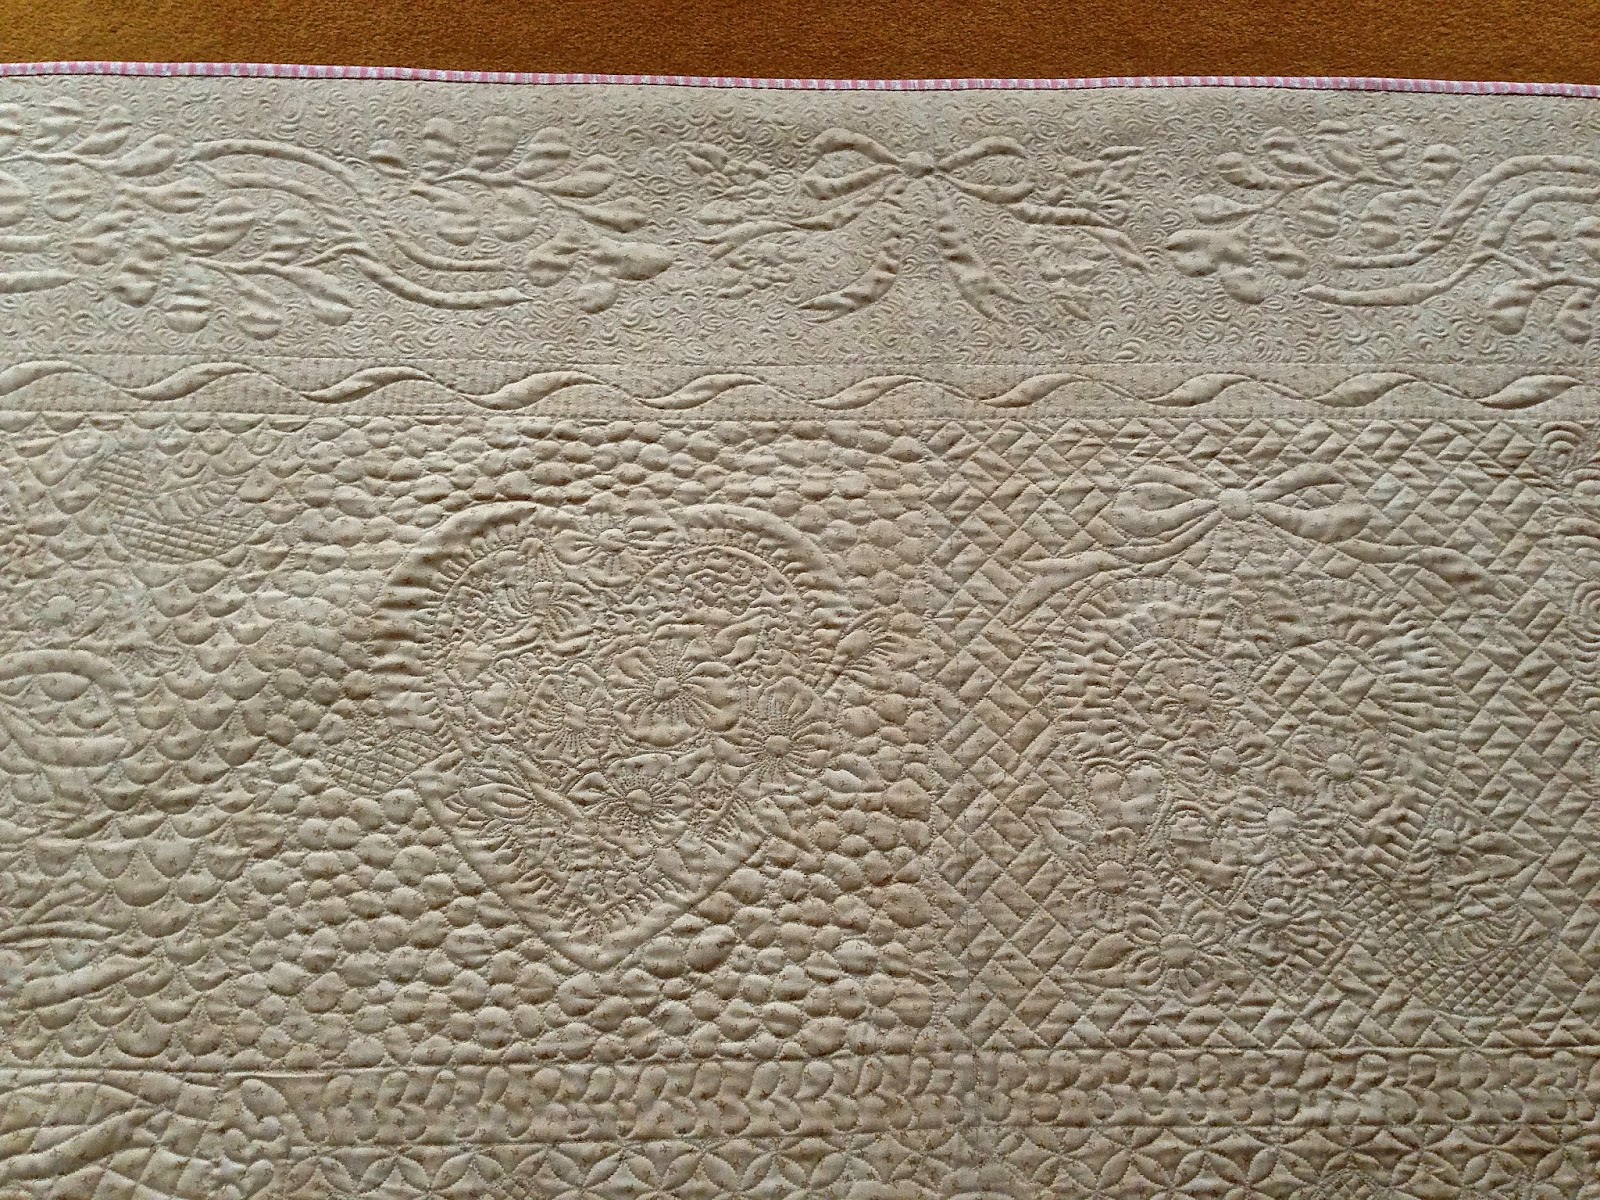
Front and back, which looks best?


I apologise for the quality of the photos, I am not a photographer and took these on my phone, but hopefully you will get an idea of what the quilting looks like in the next few photos.


I am really pleased with how it has turned out, for now I am just going to put it in my bedroom where I can see it and touch it every time I walk past it. Of all the quilts I have made so far, this is my favourite.

Please let me know which of the blocks are your favourites and whether you prefer the front or the back of the quilt. Thank you :-)